Intro to Elixir Applications on Kubernetes

Looking forward to learn through teaching, building and sharing!
Welcome to this new series about running Elixir applications on K8s (short for Kubernetes) where we explore the world of Kubernetes through the eyes of an Elixir programmer to achieve even higher availability, reliability and robustness by levering most tools in the K8s toolbox in a way that would play nice Elixir/OTP and Phoenix applications.
But before we continue let's define some base requirements to get the most out of the series.
Requirements
This series assumes some familiarity with the following technologies:
Elixir programming language and Phoenix web framework: We'll dig just enough into any of these items to prove a certain feature or situation, so having a basic understanding of both should be enough to get through the content. E.g. being able to generate and run a Phoenix application and knowing how an endpoint gets called up to a controller's function should be enough.
Container platform: A basic understanding of what containers are and what benefits they offer is important to get a better sense of why Kubernetes exists and how it complements Elixir. So, if you have written a
Dockerfile, built and run an image you already have a good base to continue.Kubernetes concepts: The following concepts are necessary to have a smooth progress through the series' articles: Pods, Deployments, Services, Nodes, Secrets, Control/Data plane, Namespaces, kubectl.
If this sounds like too much you are most certainly right, but through this series I'll do my best to keep the cognitive load to the minimum and provide explanations of each concept as we introduce them while adding references to learning resources to get all the information you might need to get a great learning experience.
This combination of tools offers a great deal of flexibility and power, but as we learned from Uncle Ben's most famous quote: with great power comes with great responsibility potential complexity.
If you are down to get your hands wet and your skin slightly burnt (as we are going on a sailing adventure with K8s ⎈😉) please keep reading as we're going to level up your deployment game.
Docker + Kubernetes + Elixir + Phoenix = 🚀
Some people might ask: Why run Elixir/Phoenix applications on Kubernetes if the BEAM already offers slightly similar features like self-healing (i.e. Supervision trees)? Or would running on a container with fewer assigned vCPUs go against letting the BEAM effectively use all available cores on a host to run faster (as more schedules would be available increasing the chances of having more concurrent jobs running in parallel)? Or even, does adding K8s into the mix (assuming we are running our app on a VM or directly on bare metal) provide any extra benefit that outweighs the extra complexity introduced?
Instead of answering each question I would like to describe some of the benefits K8s provides that are not Elixir related:
Efficient and secure rollout (and rollback) of new versions: Because you are dealing with containers you get greater boot speeds compared to VMs which reduces the rollout times significantly, and most importantly rollbacks, creating a safe deployment environment to run applications on.
Horizontal scaling: Scale in the number of containers and hosts running them at a much higher speed than scaling VMs.
Efficient and controlled resource usage: By leveraging bin-packing and fine-tuning resource requirements you can efficiently run applications on a set of hosts.
Effectively run Distributed Elixir: By incorporating libreries like libcluster we can get clusters of Erlang nodes getting automatically formed while they can efficiently communicate within the cluster.
Use a heterogeneous set of nodes to run different types of applications on them. Think of running AI applications on GPU-optimized VMs while having the rest of the applications running on regular VMs, all orchestrated by the same cluster.
Run your application locally, on several cloud platforms like AWS, GCP, Azure and others, or even set up your on-premise clusters, while using the same mental model and most descriptors ready to be reused.
And much more: run several application versions at the same time, organize them, manage configuration, orchestrate storage, extend and customize the cluster behavior, etc.
So K8s becomes an abstraction layer between our cluster of hosts and our containers offering a more reliable abstraction to run our application. We can still get all the benefits of the BEAM but they operate at a higher level than K8s so most of the time they complement each other.
That's a lot 😮💨 But bear with me as I promise that if you continue and give the tutorial a try you'll unlock a new set of possibilities for your Elixir applications, and you'll be able to answer the initial questions by yourself.
Let's go back to basics to start learning through experimentation on how we can get all these benefits.
Run a simple Phoenix app on K8s
To grasp how a Phoenix app runs on K8s we'll start by creating a new project to run it on our local host by using a local Kubernetes cluster distribution provided by Docker Desktop.
This post uses the following tools and versions:
Erlang:
26.1.2Elixir:
1.15.7 (compiled with Erlang/OTP 26)Phoenix:
1.7.10Docker Desktop :
Docker version 24.0.6-rdkubectl:
v1.28.4
Each tool listed has a link to its installation doc. For Erlang/Elixir I recommend the asdf version manager.
To be able to run Kubernetes locally you'll need to enable it in Docker Desktop by opening Settings > Kubernetes and clicking on Enable Kubernetes.
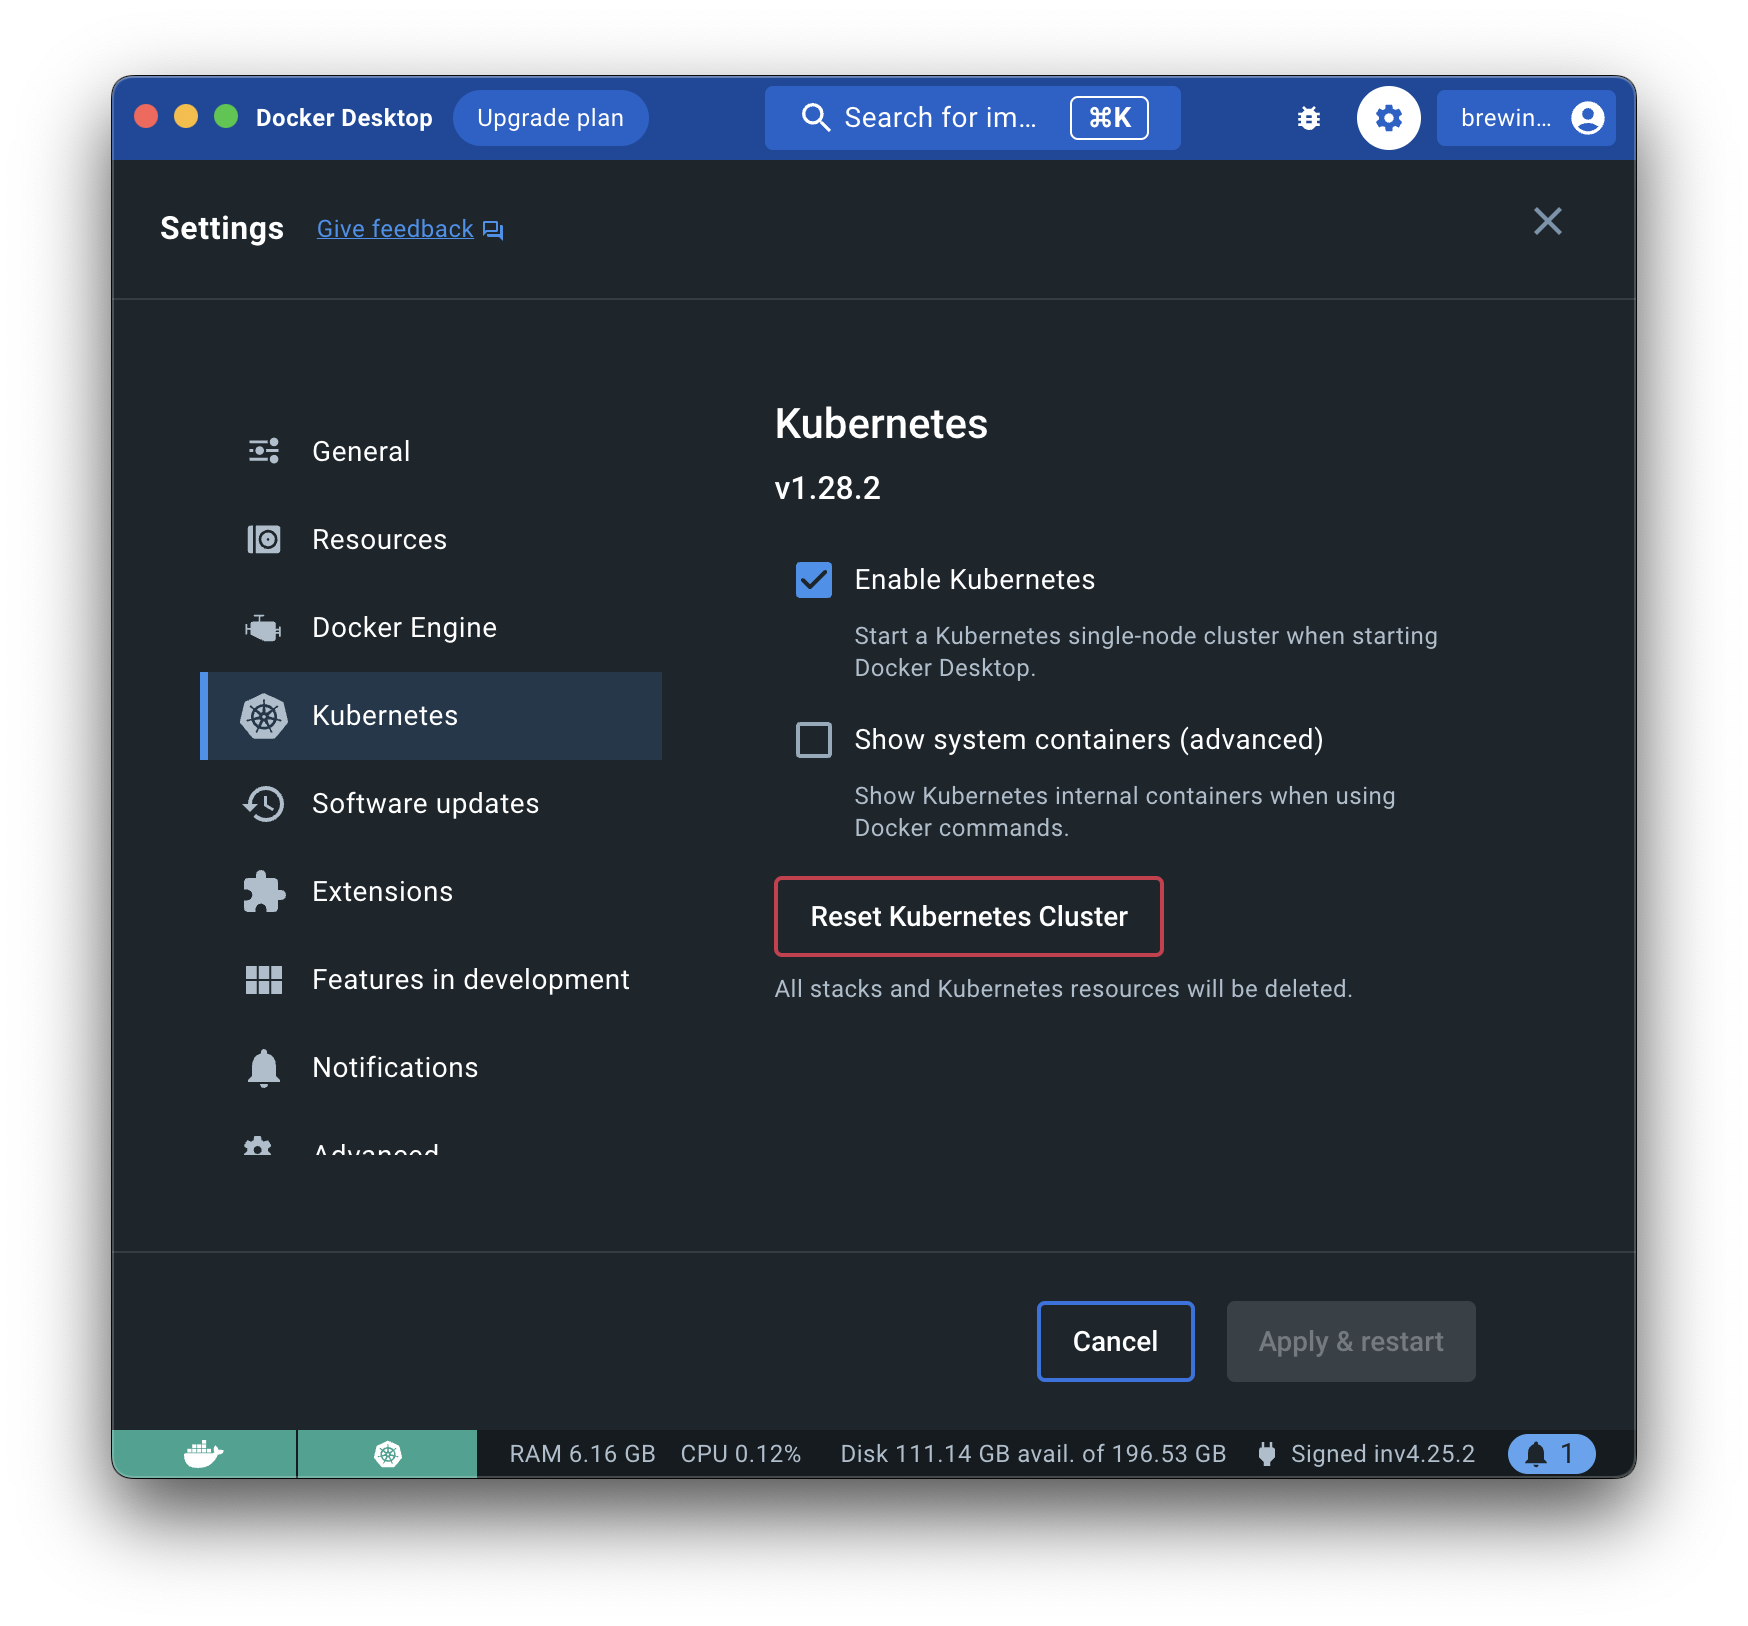
This will restart the Docker Desktop application but once it completes you'll have a ready-to-use local K8s environment. To check that's true you can run:
$ kubectl version
Client Version: v1.28.4
Kustomize Version: v5.0.4-0.20230601165947-6ce0bf390ce3
Server Version: v1.28.2
$ kubectl get nodes
NAME             STATUS   ROLES           AGE   VERSION
docker-desktop   Ready    control-plane   16h   v1.28.2
If you get anything different (besides the versions) check if docker is running (i.e. docker ps to list containers).
In case you feel adventurous there are other great options to run K8s locally like Docker's Kubernetes extension, Rancher Desktop, Microk8s and many others, but they are not required to complete this tutorial as we'll be using Docker Desktop.
Creating the app
The first thing we need is our Phoenix app so let's generate one (without ecto as we won't use it for now):
mix phx.new myapp --no-ecto
cd myapp
Next, we'll perform a few changes to the project to simulate it is a "real" application. So open your editor of choice and perform the following changes:
- Add a new route to receive
POSTrequests with an optionalnamequery parameter and then use it to return"Hello #{name}"as text with aHTTP 200status code.
lib/myapp_web/router.ex
defmodule MyappWeb.Router do
# ...
 scope "/api", MyappWeb do
    pipe_through :api

    post "/hello", HelloController, :hello
  end
# ...
end
lib/myapp_web/controllers/hello_controller.ex
defmodule MyappWeb.HelloController do
  use MyappWeb, :controller

  def hello(conn, params) do
    name = Map.get(params, "name", "World")

    conn |> put_status(200) |> text("Hello #{name}")
  end
end
Let's give it a try by running it and testing http://localhost:4000 with curl (or your HTTP client of choice).
# Start the server
mix phx.server
# Reach the route using curl (or your HTTP tool of choice)
curl -X POST http://localhost:4000/api/hello -d 'name=BrewingElixir'
Nice! We go Hello BrewingElixir which proves our app works locally so we can proceed with the next steps.
Build a container image
We are entering the world of containers now and because our application's release is custom we need to define a Dockerfile to instruct Docker on what our app's image will contain. Luckily for us, we can use the release generator task from the Phoenix project to get a ready-to-user Dockerfile. Just run:
mix phx.gen.release --docker
Let's slow down to inspect and describe what the Dockerfile provides because is very important to understand what the image will contain as is the foundation of what will get executed. This same image is what will get used and managed by K8s once we deploy it.
# 1. Build-time configureable arguments
ARG ELIXIR_VERSION=1.15.7
ARG OTP_VERSION=26.1.2
ARG DEBIAN_VERSION=bullseye-20231009-slim

ARG BUILDER_IMAGE="hexpm/elixir:${ELIXIR_VERSION}-erlang-${OTP_VERSION}-debian-${DEBIAN_VERSION}"
ARG RUNNER_IMAGE="debian:${DEBIAN_VERSION}"

# 2. The base image use to build the release.
# The file has to stages to leave "build time" files out
# from the runtime to slim down the final image to use.
# Ref: https://docs.docker.com/build/building/multi-stage/
FROM ${BUILDER_IMAGE} as builder

# install build dependencies
RUN apt-get update -y && apt-get install -y build-essential git \
    && apt-get clean && rm -f /var/lib/apt/lists/*_*

# prepare build dir
WORKDIR /app

# install hex + rebar
RUN mix local.hex --force && \
    mix local.rebar --force

# set build ENV
ENV MIX_ENV="prod"

# install mix dependencies
COPY mix.exs mix.lock ./
RUN mix deps.get --only $MIX_ENV
RUN mkdir config

# copy compile-time config files before we compile dependencies
# to ensure any relevant config change will trigger the dependencies
# to be re-compiled.
COPY config/config.exs config/${MIX_ENV}.exs config/
RUN mix deps.compile

COPY priv priv

COPY lib lib

COPY assets assets

# compile assets
RUN mix assets.deploy

# Compile the release
RUN mix compile

# Changes to config/runtime.exs don't require recompiling the code
COPY config/runtime.exs config/

COPY rel rel
RUN mix release

# start a new build stage so that the final image will only contain
# the compiled release and other runtime necessities
FROM ${RUNNER_IMAGE}

RUN apt-get update -y && \
  apt-get install -y libstdc++6 openssl libncurses5 locales ca-certificates \
  && apt-get clean && rm -f /var/lib/apt/lists/*_*

# Set the locale
RUN sed -i '/en_US.UTF-8/s/^# //g' /etc/locale.gen && locale-gen

ENV LANG en_US.UTF-8
ENV LANGUAGE en_US:en
ENV LC_ALL en_US.UTF-8

WORKDIR "/app"
RUN chown nobody /app

# set runner ENV
ENV MIX_ENV="prod"

# Only copy the final release from the build stage
COPY --from=builder --chown=nobody:root /app/_build/${MIX_ENV}/rel/myapp ./

USER nobody

# If using an environment that doesn't automatically reap zombie processes, it is
# advised to add an init process such as tini via `apt-get install`
# above and adding an entrypoint. See https://github.com/krallin/tini for details
# ENTRYPOINT ["/tini", "--"]

CMD ["/app/bin/server"]
The file is ready to use but keep in mind this is where you'll come to add system dependencies required by our application. E.g. Installing ffmpeg if you intend to use it for video manipulation. In other cases, you'll want to use a different "base image" for your container image to increase security and/or reduce image size. Those are also actions that will be applied to this same file.
K8s truly excels is being able to run multiple Pods from different images to easily validate their correct functionality (think canary or blue/green deployments) while running the same underlying nodes.
Continuing with our application, let's build the docker image based on the Dockerfile we've just seen by running:
docker build -t myapp .
This should effectively build the image and store it with the tag latest. You can verify this by running:
docker images myapp
Output:
REPOSITORY   TAG       IMAGE ID       CREATED              SIZE
myapp        latest    68e102c0eb9d   About a minute ago   125MB
Sweet! We have our image ready and is only 125MB! 😅 . You are probably wondering: Is that the best we can do? Is not, but should be enough for now. If you are curious about what to use when aiming at a small image check out Alpine Linux at Docker Hub. Images start at 5MB which is 4% of our current image size!
Now let's run it to verify the image is good.
docker run -p 4000:4000 myapp:latest
Oh no! The output looks starts like this:
** (RuntimeError) environment variable SECRET_KEY_BASE is missing. You can generate one by calling: mix phx.gen.secret
Ah! That's because we are running a release which executes config/runtime.exs during start-up which ends up raising an exception when SECRET_KEY_BASE is not provided. Let's do as suggested and provide the value to docker like this:
SECRET_KEY_BASE=$(mix phx.gen.secret)
docker run -p 4000:4000 -e SECRET_KEY_BASE=$SECRET_KEY_BASE myapp:latest
Output:
13:59:38.371 [info] Running MyappWeb.Endpoint with cowboy 2.10.0 at :::4000 (http)
13:59:38.372 [info] Access MyappWeb.Endpoint at https://example.com
Congratulations! You have a Phoenix application running within a Docker container.
You probably noticed the -p 4000:4000 parameter when running docker. This is necessary to instruct Docker to connect the host's port to the container's port. You can use a different one if you like (as long as is above 1024 and below 65535) as long as it connects to the listening port in the container which is 4000 for this application.
In another terminal run the following curl command to verify the app's code gets executed:
curl -X POST http://localhost:4000/api/hello -d 'name=BrewingElixirFromDocker'
Output:
Hello BrewingElixirFromDocker⏎
Great! The app works as expected. You can stop the container by typing ctrl+c.
At this point, you might have noticed you had to:
Manually start/stop the app.
Provide the needed configuration to docker to let the app start correctly.
Set up the hosts and container ports to allow access to the service.
which is fine for testing apps locally, but what would happen if you need to perform a deployment with zero downtime? Or if the universe has a glitch that makes the BEAM unexpectedly crash? 💥 At this moment you would have to start looking for other tools that would help solve these issues. But look no further! That's one of the many features Kubernetes offers, so let's finally test this thing 😎
Deploy to Kubernetes⎈
To deploy your application to K8s you'll use a combination of the following resources:
Deployment: provides declarative updates forPods(andReplicaSets). This is where we define what docker image to use.Service: used to expose our application running in your cluster behind a single outward-facing endpoint. In simple terms, it connects a deployment to one or more ports.ConfigMaps: an object used to store non-confidential data in key-value pairs.Secrets: similar toConfigMapsbut are specifically intended to hold confidential data.
These resources are all defined as YAML files that get applied by kubectl which instructs K8s on what resources to create or update. This is key as K8s allows you to declaratively (and sometimes imperatively) define resources and the state you want for them. Can't stress how useful and important this is. It allows you to define the "end state" of the resource, even when something is happening mid-flight. K8s will "figure out" which steps are needed to get to the desired state effectively.
Continuing with the setup, go ahead and create a directory under the root folder of our Phoenix projects called infra.
mkdir infra
You'll place all K8s descriptors there for now. In more sophisticated deployments these files could be included in a separate repository with Terraform and Ansible files in case that's the IaC preference of the team/company.
Now create a deployment descriptor. This is usually a YAML file that declares what images to use within the Pods, the naming used within the cluster, what arguments to pass and many other configurations to instruct K8s on how to orchestrate the deployment. So go ahead and create:
infra/deployment.yaml
apiVersion: apps/v1
kind: Deployment
metadata:
  name: myapp-deployment
  labels:
    app: myapp
spec:
  replicas: 1
  selector:
    matchLabels:
      app: myapp
  template:
    metadata:
      labels:
        app: myapp
    spec:
      containers:
      - name: myapp
        image: myapp:latest
        ports:
        - containerPort: 4000
You can see how the name of the deployment is defined as well as the image and ports used by the container.
With the following command, you'll instruct your Kubernetes cluster through kubectl to read the deployment descriptor and apply the desired state:
kubectl apply -f infra/deployment.yaml
Output:
deployment.apps/myapp-deployment created
This command returns almost instantaneously but the resources are still getting created. To check the state run:
kubectl get deploy
Output:
NAME               READY   UP-TO-DATE   AVAILABLE   AGE
myapp-deployment   0/1     1            0           7s
Or check the Pods associated with the deployment:
kubectl get pod
Output:
NAME                                READY   STATUS             RESTARTS   AGE
myapp-deployment-7cc9745dcb-bpkt6   0/1     ImagePullBackOff   0          3m
Something looks off as the READY column shows 0/1 deployments are ready, and the same when we list the Pods. By checking the STATUS of the latest output we can see it is reporting ImagePullBackOff. This is expected because the image provided can't be found by the cluster because is not stored in a registry. A registry is an image repository that K8s uses to look for images. By default, K8s will look for images at DockerHub and only be able to access them if they are public or the cluster has credentials configured to access private images.
For the sake of simplicity, we'll stick with Docker's product and create an account at DockerHub. Once your account is ready create a private repository for your docker image:
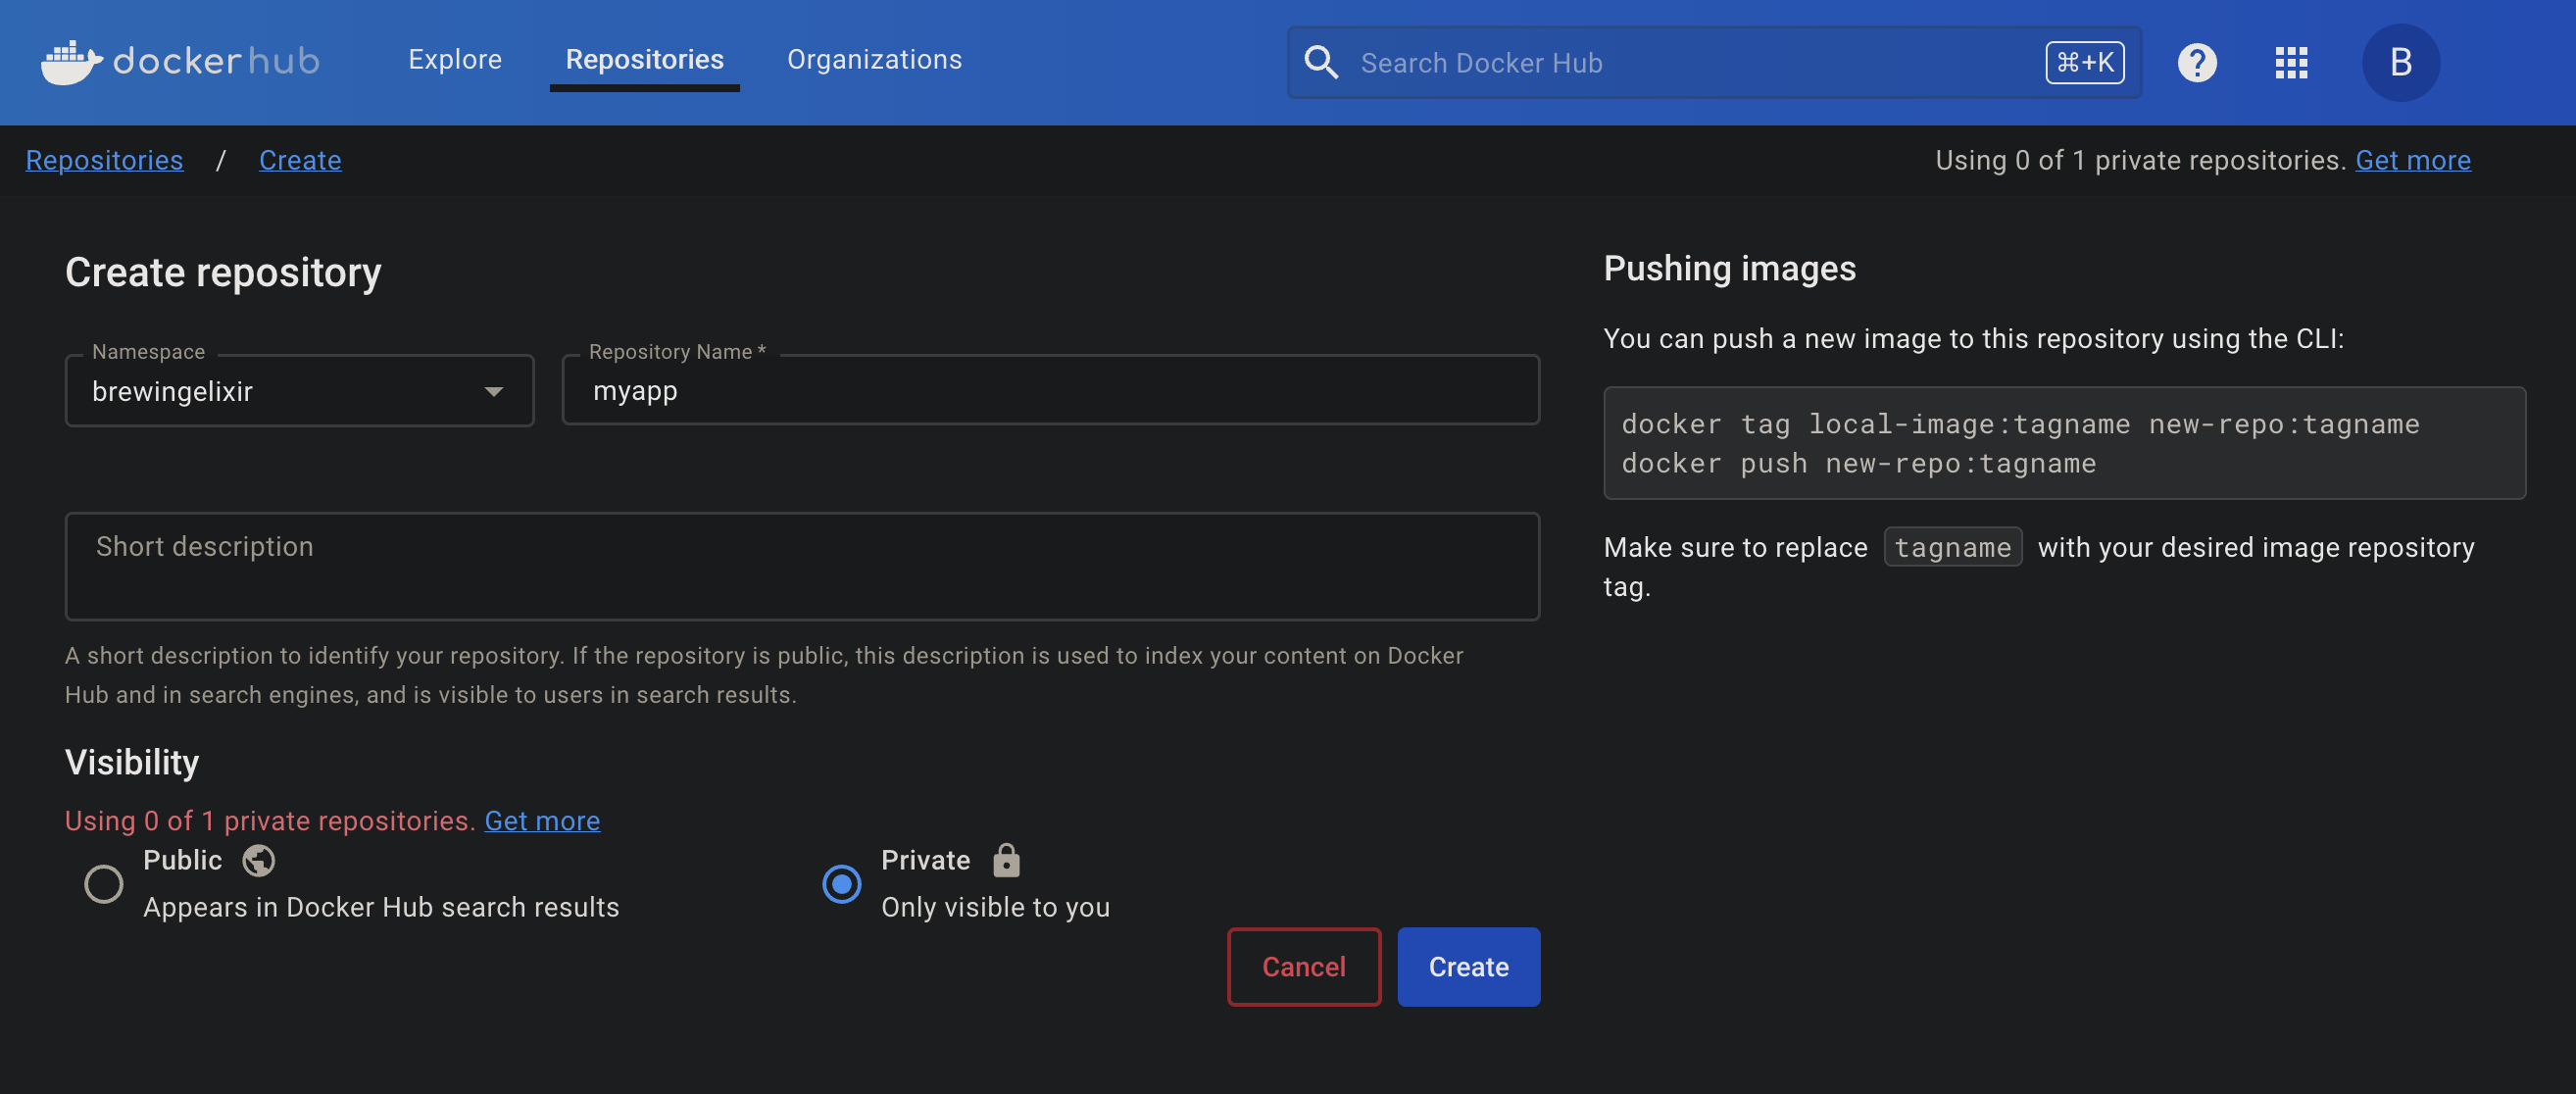
⚠️The namespace will be different so remember to change brewingelixir with the name of your namespace.
To be able to push to the right registry we need to tag our existing image (or build it with the desired tag). To achieve that run:
docker tag myapp:latest brewingelixir/myapp:0.0.1
A good practice for image tags is using Semantic Versioning (or some combination of semver + Git SHA). This way we keep the image builds unique and immutable. This will get us a more important benefit in K8s as this will help cache images in the nodes which speeds up rollouts and rollbacks.
This will create a new image name and tag. You can check they have the same image's id by running:
docker images | grep myapp
Output:
brewingelixir/myapp  0.0.1      366738717276   17 hours ago    125MB
myapp                latest     68e102c0eb9d   27 hours ago    125MB
You'll notice two images, one named myapp and another one similar to this one: brewingelixir/myapp. Finally, push this image to the DockerHub registry:
docker push brewingelixir/myapp:0.0.1
At this point your app is stored in DockerHub ready to be pulled by your Kubernetes cluster. In more sophisticated deployments you'll need to configure some credentials to instruct K8s on what to use to pull private images from other registries. But that's something we don't need to think about for the local version.
Continue with editing infra/deployment.yaml to update the image value:
...
        image: brewingelixir/myapp:0.0.1
...
And apply the change with kubectl:
kubectl apply -f infra/deployment.yaml
And let's check again if the pod is running:
kubectl get po
Output:
NAME                                READY   STATUS   RESTARTS      AGE
myapp-deployment-546cbb5f96-9ptjb   0/1     Error    1 (14s ago)   16s
We now have a different error 🤔 Let's inspect the events by executing:
kubectl describe pod myapp-deployment-546cbb5f96-9ptjb
The output should look similar to the following one:
Events:
  Type     Reason     Age                From               Message
  ----     ------     ----               ----               -------
  Normal   Scheduled  87s                default-scheduler  Successfully assigned default/myapp-deployment-546cbb5f96-9ptjb to docker-desktop
  Normal   Pulled     43s (x4 over 87s)  kubelet            Container image "brewingelixir/myapp:0.0.1" already present on machine
  Normal   Created    43s (x4 over 87s)  kubelet            Created container myapp
  Normal   Started    43s (x4 over 87s)  kubelet            Started container myapp
  Warning  BackOff    13s (x6 over 83s)  kubelet            Back-off restarting failed container myapp in pod myapp-deployment-546cbb5f96-9ptjb_default(e5f972bc-d5fa-47df-b59f-e6e18ba31520)
It seems like K8s could fetch the docker image from DockerHub but is reporting ack-off restarting failed container myapp. Maybe the container's logs will give some extra insight:
kubectl logs myapp-deployment-546cbb5f96-9ptjb
Output:
ERROR! Config provider Config.Reader failed with:
** (RuntimeError) environment variable SECRET_KEY_BASE is missing.
You can generate one by calling: mix phx.gen.secret

    /app/releases/0.1.0/runtime.exs:31: (file)
    (elixir 1.15.7) src/elixir.erl:396: :elixir.eval_external_handler/3
    (stdlib 5.1.1) erl_eval.erl:750: :erl_eval.do_apply/7
    (stdlib 5.1.1) erl_eval.erl:494: :erl_eval.expr/6
    (stdlib 5.1.1) erl_eval.erl:136: :erl_eval.exprs/6
    (elixir 1.15.7) src/elixir.erl:375: :elixir.eval_forms/4
    (elixir 1.15.7) lib/module/parallel_checker.ex:112: Module.ParallelChecker.verify/1
    (elixir 1.15.7) lib/code.ex:543: Code.validated_eval_string/3

Runtime terminating during boot ({#{message=><<101,110,118,105,114,111,110,109,101,110,116,32,118,97,114,105,97,98,108,101,32,83,69,67,82,69,84,95,75,69,89,95,66,65,83,69,32,105,115,32,109,105,115,115,105,110,103,46,10,89,111,117,32,99,97,110,32,103,101,110,101,114,97,116,101,32,111,110,101,32,98,121,32,99,97,108,108,105,110,103,58,32,109,105,120,32,112,104,120,46,103,101,110,46,115,101,99,114,101,116,10>>,'__struct__'=>'Elixir.RuntimeError','__exception__'=>true},[{elixir_eval,'__FILE__',1,[{file,"/app/releases/0.1.0/runtime.exs"},{line,31}]},{elixir,eval_external_handler,3,[{file,"src/elixir.erl"},{line,396},{error_info,#{module=>'Elixir.Exception'}}]},{erl_eval,do_apply,7,[{file,"erl_eval.erl"},{line,750}]},{erl_eval,expr,6,[{file,"erl_eval.erl"},{line,494}]},{erl_eval,exprs,6,[{file,"erl_eval.erl"},{line,136}]},{elixir,eval_forms,4,[{file,"src/elixir.erl"},{line,375}]},{'Elixir.Module.ParallelChecker',verify,1,[{file,"lib/module/parallel_checker.ex"},{line,112}]},{'Elixir.Code',validated_eval_string,3,[{

Crash dump is being written to: erl_crash.dump...done
Oh! We forgot to set the value of theSECRET_KEY_BASE env var. This can easily be solved by creating a secret resource. But first, create a key using the handy phx.gen.secret mix task.
SECRET_KEY_BASE=$(mix phx.gen.secret)
echo -n $SECRET_KEY_BASE | base64
The output of the last command will give you the base 64 representation of the generated value. K8s requires us to do this because any control character can easily create a syntax error in the YAML file.
Next, create a secret descriptor with the name infra/secret.yaml
Important: The names of these files have no relation with the resource they are creating.
apiVersion: v1
kind: Secret
metadata:
  name: myapp-secret
data:
  key_base: c3Z3b3loQWt0MlJ2bytvRlBwMU4zMjhmNlhBVkRzaTE4cmVoZHRaUGlEMWJ1b0w5Y25sQnJwZjhRWnhETm5ScA==
To effectively create the secret in K8s run:
kubectl apply -f infra/secret.yaml
To verify the resource exists execute:
kubectl get secret
Output:
NAME           TYPE     DATA   AGE
myapp-secret   Opaque   1      17h
The last piece of this puzzle is connecting this secret to the deployment so the app knows where to fetch the value from. So edit infra/deployment.yaml to add the env element at the same level as the image:
....
    spec:
      containers:
      - name: myapp
        image: brewingelixir/myapp:0.0.1
        ports:
        - containerPort: 4000
        env:
        - name: SECRET_KEY_BASE
          valueFrom:
            secretKeyRef:
              name: myapp-secret
              key: key_base
You can see how SECRET_KEY_BASE is the name of the env var that will get extracted from myapp-secret secret under the key key_base.
You can save the change and apply by running: kubectl apply -f infra/deployment.yaml
Going back to running kubectl get pods list you can see the status is now Running!
NAME                                READY   STATUS    RESTARTS   AGE
myapp-deployment-78dd444d79-sdmpq   1/1     Running   0          1m
This is great, but how do we access your application? That's a task for a Service. So let's create one and associate it with the deployment.
Create infra/service.yaml and fil it wth:
apiVersion: v1
kind: Service
metadata:
  name: myapp-service
spec:
  selector:
    app: myapp
  ports:
    - protocol: TCP
      port: 4000
      targetPort: 4000
  type: LoadBalancer
Apply the change:
kubectl apply -f infra/service.yaml
Output:
service/myapp-service created
And check the service's resource state:
kubectl get svc
Output:
NAME            TYPE           CLUSTER-IP     EXTERNAL-IP   PORT(S)          AGE
kubernetes      ClusterIP      10.96.0.1      <none>        443/TCP          51m
myapp-service   LoadBalancer   10.110.24.84   localhost     4000:32660/TCP   8m45s
Let's give the app a try by going to http://localhost:4000. And also try the curl command one more time:
curl -X POST http://localhost:4000/api/hello -d 'name=BrewingElixirFromK8s'
Output:
Hello BrewingElixirFromK8s⏎
Awesome! You now have a Phoenix app running on K8s⛵️! Next, let's try a few K8s tricks to get a sense of the power of this powerhouse.
Perform a rollout
To get a sense of how fast and easy is to perform a rollout we'll simulate creating a new version to deploy it. To do so edit the HelloController controller and add an /echo route.
lib/myapp_web/router.ex
...
  scope "/api", MyappWeb do
    pipe_through :api

    post "/hello", HelloController, :hello
    post "/echo", HelloController, :echo
  end
...
Then add a new function within the HelloControler to return the params as json.
lib/myapp_web/controllers/hello_controller.ex
defmodule MyappWeb.HelloController do
  #Some existing code.....

  def echo(conn, params) do
    conn |> put_status(200) |> json(params)
  end
end
After you verify that this works as expected by running mix phx.server and hitting it with curl, you can build and tag the new image to push it to the registry:
docker build -t brewingelixir/myapp:0.0.2 .
docker push brewingelixir/myapp:0.0.2
This time we started by defining the tag you'll use to push from the start. This should save you from having to perform the tag step.
Finally, edit the deployment descriptor to update it with the new tag version.
infra/deploymnet.yaml
...
     image: brewingelixir/myapp:0.0.2
...
and apply the changes to the deployment:
kubectl apply -f infra/deployment.yaml
To watch the deployment or pod replacement in near real time you can run:
kubectl get deploy -w
# or
kubectl get pod -w
To verify the rollout is complete run:
kubectl rollout status deploy myapp-deployment
Expected output:
deployment "myapp-deployment" successfully rolled out
In case you want to verify the image currently used by the deployment is the same one you have just applied then run:
kubectl describe deploy myapp-deployment
It will provide all the runtime details of the myapp-deployment deployment object. Look for Image to verify the name and tag are the right ones.
"Huston, we have a problem" a.k.a. Rollback ASAP!
Let's imagine this deployment starts causing issues and you need to perform a rollback as fast as possible!
To go back to the immediate previous version just run:
kubectl rollout undo deployment/myapp-deployment
Verify the version is back to 0.0.1 by running:
kubectl describe deploy myapp-deployment | grep Image
Great! That was a really fast rollback. Doesn't that feel great?!
To go back to 0.0.2 just run kubectl apply -f infra/deployment.yaml again or create a new tag with the "fixes" so the app works as expected this time 🫡.
Scale-out our app
K8s has the concept of replicas which are more instances of the same pod running in the cluster. They are normally independent of each other but associated with the service to let this one redistribute the load between them.
$ kubectl scale deployment/myapp-deployment --replicas=10
$ kubectl get po
kubectl get po
NAME                                READY   STATUS    RESTARTS   AGE
myapp-deployment-8674fb85bc-8qcjp   1/1     Running   0          2s
myapp-deployment-8674fb85bc-clvgv   1/1     Running   0          2s
myapp-deployment-8674fb85bc-fdv5t   1/1     Running   0          2s
myapp-deployment-8674fb85bc-h5bmb   1/1     Running   0          3m19s
myapp-deployment-8674fb85bc-ptn4c   1/1     Running   0          2s
myapp-deployment-8674fb85bc-pzl26   1/1     Running   0          2s
myapp-deployment-8674fb85bc-snnpl   1/1     Running   0          2s
myapp-deployment-8674fb85bc-tpqnc   1/1     Running   0          2s
myapp-deployment-8674fb85bc-v7lrq   1/1     Running   0          2s
myapp-deployment-8674fb85bc-xwqvm   1/1     Running   0          2s
Wow, that was fast! You can even go to 0 if that's needed.
kubectl scale deployment/myapp-deployment --replicas=0
Manual scaling is fine if you have a predictable load that won't change significantly over time. In case you need to deal with significant highs and lows over time then you can use a combination of:
Horizontal Pod Autoscaler (HPA): adjusts the number of replicas of an application based on resources and/or custom metrics.
Vertical Pod Autoscaler (VPA): adjusts the resource requests and limits of a container.
Cluster Autoscaler (CA): adjusts the number of nodes in the cluster when pods fail to schedule or when nodes are underutilized.
But that's something for a future post in this series 😉
Note: The code for this post can be found here.
Conclusion and what's next in the series
If you've deployed applications to Kubernetes in the past (e.g. Go, Node, Java, etc) you might be thinking: This looks very similar to what needs to be done to deploy those non-Elixir applications. And you'll be right! The process is pretty much agnostic to the application running inside the container. It will only become slightly different when you aim at running Distributed Erlang applications where you'd need to let the application easily discover other Erlang nodes. Luckily, we can avoid having to deal with that situation as long as our application is fine without it. E.g. Using shared databases, Phoenix PubSub through a Redis cluster, etc.
In summary, with a couple of commands we end up with a scalable deployment for an application that performs safe rollouts and rollbacks in an environment that closely resembles the ones running on cloud providers. Isn't that great?!
Next in this series, we'll explore deploying this same app to the Internet, starting from simple K8s distributions like Rancher's K3s to full-featured distributions like EKS which is AWS managed Kubernetes solution.